
C3dapp Studio – a cloud environment for writing 3D apps in Java and running them on Websites
1. Overview
C3dapp Studio is a cloud environment in which you can write 3D apps using Java programming language and run them in a web browser. There is no need to install any software components, such as the Java compiler or an Integrated Development Environment (IDE), on your computer. All you need to do is to run C3dapp Studio in a web browser on a computer with internet access, as long as the web browser is relatively new, i.e. is WebGL capable.
This tutorial guides you through the steps of using C3dapp Studio to build a 3D app showing a room with three doors. Two people enter the room through the entrance door before splitting up and exiting through the two exit doors separately.
Although knowledges of the Java language and some basic 3D graphics concepts are useful, neither is essential for going through the tutorial.
C3dapp Studio, this document, and the texture image resources used in the tutorial can be accessed or downloaded from https://oakhousesoftware.com.
2. Download the texture image files
Four image files are used in the case to be built. Open the following download link in a web browser and download the files before saving them in a folder on your computer.
| Download link: | https://oakhousesoftware.com/downloads/ |
| Files to download: | BrickTile.png DoorBack.png DoorFront.png GroundTile.png |
3. Prepare to work on the case in C3dapp Studio
Open a web browser on your computer. Start the C3dapp Studio in the browser with the following link:
https://app.oakhousesoftware.com/c3dapp-studio/
Click on tab ‘Case Editor’, then click on ‘Create a new case‘. A C3dapp case with title ‘New Case‘ is automatically prepared for you. Change the Case title to ‘RoomWithThreeDoors1‘.
4. Upload texture images for the case
In the tab ‘Case Editor’, click on ‘Add an image‘ to open the Image Bundle Organizer. Upload the four image files in the following order:
| image file name | BrickTile.png | DoorFront.png | DoorBack.png | GroundTile.png |
| pixel size | 32 x 16 | 64 x 128 | 64 x 128 | 128 x 128 |
 | ||||
| image id | 0 | 1 | 2 | 3 |
After uploading the image files, click on ‘Close and Show Code‘ to close the Image Bundle Organizer and return to the Case Editor main panel.
Check and make sure that the four images are arranged in ‘Case Editor’ in the order shown above.
5. Write the Java code for the case
In C3dapp Studio, Java code for a C3dapp case can be worked on in the code editing box in the Case Editor panel. As a new C3dapp case, a few coding lines have been pre-prepared in the code editing box.
The code editing box as a multiline text editor has typical text editing capabilities. If you tap or click inside the code editing box, a text inserting caret is shown. You may move the caret around, insert text by typing on keyboard, and delete characters with the backspace key. Text can be selected by pointer dragging, or Ctrl+A to select all. Use Ctrl+C to copy selected text to clipboard, and use Ctrl+V to paste clipboard content to the text at the caret position. Other useful shortcuts include Ctrl+X for cut and Ctrl+Z for undo.
With an Apple Mac keyboard, use the Cmd key in place of the Ctrl key for the above shortcuts.
You may practise with text editing and copying/pasting to familiarise with how the coding lines can be worked on. The easiest way to work through the tutorial is to copy coding lines from this document and paste them in the Case Editor’s code editing box at required caret locations.
5.1) Prepare the starting point of the java code
To form the starting point of the java code of the tutorial, delete all the existing coding lines in the code editing box and replace them by the following lines:
package com.ohs.gt.client;

//The external class importing zone
import dmive.core3d.app.AppClient3D;

public class GtAppClient extends AppClient3D {

    //The parameter declaration zone

    @Override
    public void initApp() {
        //The scene initialization zone
    }

    @Override
    public void onCanvasResize() {
        //The view configuration zone
    }

    @Override
    public void pickAction(int pickX, int pickY, String keyCmd) {
        //The user interaction zone
    }

    @Override
    public void preUpdate() {
        //The drawing cycle pre-updating zone
    }

    //The internal class definition zone
}
Make sure that the Case title is ‘RoomWithThreeDoors1‘. Click on ‘Build C3dapp for the case‘ to build and run the case.
If the building process is successful, C3dapp Studio switches to the ‘Built Cases’ tab within which a window with black background is displayed under the case title ‘RoomWithThreeDoors1‘.
Click on ‘Open case‘ under the case title ‘RoomWithThreeDoors1‘ to get back to Case Editor.
Note that the Case tile is now RoomWithThreeDoors1_1. Change it to RoomWithThreeDoors2.
5.2) Set background colour and viewing behaviour
We continue to work inside the code editing box in the ‘Case Editor’ tab of C3dapp Studio.
In the external class importing zone, add the following lines:
import dmive.core3d.app.ClientScene3D;
import dmive.core3d.shape.ViewPlatform;
In the parameter declaration zone, add the following line:
private ClientScene3D cs;
In the scene initialization zone, add the following lines:
        cs = getCs();
        cs.setBgColor(0.12, 0.3, 0.3);
In the view configuration zone, add the following lines:
        ViewPlatform vp = getVp();
        vp.setLookUp(-9.0, -15.0, 14.0, 0.0, 0.0, 1.0, 0.0, 0.0, 1.0);
        vp.setNearZ(0.1);
        vp.setFarZ(200.0);
        vp.setViewDisMin(0.2);
        vp.setViewDisMax(150.0);
        vp.setvZmin(-2.0);
        vp.setViewingBehavior(1);
        vp.setTouchZoomMul(50.0);
Make sure that the Case title is ‘RoomWithThreeDoors2‘. Click on ‘Build C3dapp for the case‘ to build and run the case.
If the building process is successful, the ‘Built Cases’ tab is shown, where the app window with case title ‘RoomWithThreeDoors2‘ shows with a colour background.
Click on ‘Open case‘ under the case title ‘RoomWithThreeDoors2‘ to get back to Case Editor.
Note that the Case title is now RoomWithThreeDoors2_1. Change it to RoomWithThreeDoors3.
5.3) Build walls for the room
In the external class importing zone, add the following line:
import dmive.core3d.shape.TexHex;
In the internal class definition zone, create the Wall class by adding the following lines:
    private class Wall extends TexHex {

        private Wall(double x0, double x1, double y0, double y1) {
            super(x0, x1, y0, y1, 0.0, 2.0);
            setWestTex(0, 0.64, 0.32, 0.0, 0.0);
            setEastTex(0, 0.64, 0.32, 0.0, 0.0);
            setSouthTex(0, 0.64, 0.32, 0.0, 0.0);
            setNorthTex(0, 0.64, 0.32, 0.0, 0.0);
            buildShape(cs);
        }
    }
In the scene initialization zone, add the following lines after existing lines:
        cs.addShape(new Wall(-6.0, 4.5, -5.0, -4.5));
        cs.addShape(new Wall(5.5, 6.0, -5.0, 3.5));
        cs.addShape(new Wall(-6.0, 6.0, 4.5, 5.0));
        cs.addShape(new Wall(-6.0, -5.5, -3.5, 4.5));
Make sure that the Case title is RoomWithThreeDoors3. Click on ‘Build C3dapp for the case‘ to build and run the case.
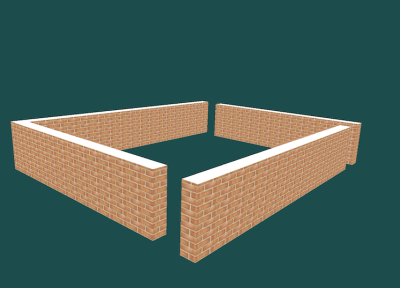
When case building is successful, a new case with title ‘RoomWithThreeDoors3‘ is added in Built Cases. It shows the surrounding walls of the room. Use mouse or touch points to manipulate the view. Zooming is achieved by mouse wheel rotation or changing the distance between two touch points on a touch screen.
Click on ‘Open case‘ under the title ‘RoomWithThreeDoors3‘ to get back to Case Editor.
Note that the Case title is now RoomWithThreeDoors3_1. Change it to RoomWithThreeDoors4.
5.4) Fit doors to the room
In the internal class definition zone, create the Door class by adding the following lines:
    private class Door extends TexHex {

        private Door(double rot, double x0, double y0) {
            TexHex doorBody = new TexHex(0.0, 1.0, -0.1, 0.0, 0.0, 2.0);
            doorBody.setSouthTex(1, 1, 1);
            doorBody.setNorthTex(2, 1, 1);
            doorBody.buildShape(cs);
            addChild(doorBody);
            setRotation(rot, 0.0, 0.0, 1.0);
            setTranslation(x0, y0, 0.0);
        }

        //Set door animation
    }
In the parameter declaration zone near the top of the file, add the following line:
private Door[] doors;
In the scene initialization zone, add the following lines after existing lines:
        doors = new Door[3];
        doors[0] = new Door(-90.0, -5.9, -3.5);
        doors[1] = new Door(180.0, 5.5, -5.0);
        doors[2] = new Door(-90.0, 6.0, 4.5);
        cs.addShape(doors[0]);
        cs.addShape(doors[1]);
        cs.addShape(doors[2]);
Make sure that the Case title is RoomWithThreeDoors4. Click on ‘Build C3dapp for the case‘ to build and run the case.
When case building is successful, a new case with title ‘RoomWithThreeDoors4‘ is added in Built Cases. It shows that three doors have been added to close the gaps between the walls of the room. The doors won’t open at the moment as door animation codes have not yet been added.

Click on ‘Open case‘ under the title ‘RoomWithThreeDoors4‘ to get back to Case Editor.
Note that the Case title is now RoomWithThreeDoors4_1. Change it to RoomWithThreeDoors5.
5.5) Add people to the scene
In the external class importing zone, add the following line:
import dmive.core.utils.DVUtils;
In the internal class definition zone, create the Person class by adding the following lines:
    private class Person extends TexHex {

        private final int pId;
        private double rpx;
        private double rpy;

        private Person(int pId) {
            super(-0.1, 0.1, -0.1, 0.1, 0.0, 1.5);
            setWestCol(0.9, 0.9, 0.0, 1.0);
            setEastCol(0.8, 0.8, 0.0, 1.0);
            setSouthCol(0.7, 0.7, 0.0, 1.0);
            setNorthCol(0.6, 0.6, 0.0, 1.0);
            setHighCol(1.0, 1.0, 0.0, 1.0);
            buildShape(cs);
            this.pId = pId;
            setPosition(-1.0);
        }

        private void setPosition(double alpha1) {
            if (alpha1 < -0.9) {
                rpx = -4.0 + 8.0 * DVUtils.getRandomInt(1001) / 1000.0;
                rpy = -3.0 + 6.0 * DVUtils.getRandomInt(1001) / 1000.0;
                setTranslation(rpx, rpy, 0.0);
            } else {
                //Set animated position
            }
        }

        //Set person animation
    }
In the parameter declaration zone near the top of the file, add the following lines:
    private Person person0;
    private Person person1;
In the scene initialization zone, add the following lines after existing lines:
        person0 = new Person(0);
        person1 = new Person(1);
        cs.addShape(person0);
        cs.addShape(person1);
Make sure that the Case title is RoomWithThreeDoors5. Click on ‘Build C3dapp for the case‘ to build and run the case.
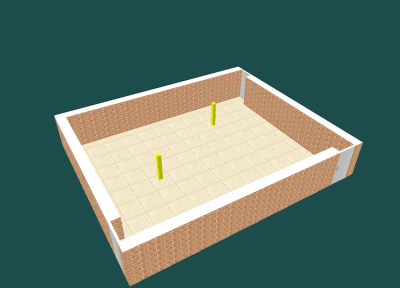
When case building is successful, a new case with title ‘RoomWithThreeDoors5‘ is added in Built Cases. It shows two people in the room, each taking a random position.
Click on ‘Open case‘ under the title ‘RoomWithThreeDoors5‘ to get back to Case Editor.
Note that the Case title is now RoomWithThreeDoors5_1. Change it to RoomWithThreeDoors6.
5.6) Add floor for the room
In the scene initialization zone, add the following lines after existing lines:
        TexHex floor = new TexHex(-6.0, 6.0, -5.0, 5.0, -0.002, 0.0);
        floor.setHighTex(3, 1.0, 1.0, 0.0, 0.0);
        floor.setLowCol(0.3, 0.3, 0.3, 0.75);
        floor.buildShape(cs);
        cs.addShape(floor);
Make sure that the Case title is RoomWithThreeDoors6. Click on ‘Build C3dapp for the case‘ to build and run the case.
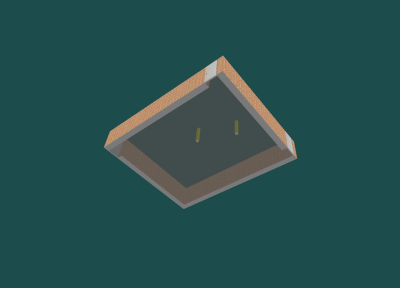
When case building is successful, a new case with title ‘RoomWithThreeDoors6‘ is added in Built Cases. It shows the floor in the room. Check the translucent effect by changing the view to look from underneath.
Click on ‘Open case‘ under the title ‘RoomWithThreeDoors6‘ to get back to Case Editor.
Note that the Case title is now RoomWithThreeDoors6_1. Change it to RoomWithThreeDoors7.
5.7) Open and close doors
Inside the internal class Door, add the following lines under the line //Set door animation:
        private void preUpdate() {
            if (isAnimationOn()) {
                double openFrac = 0.0;
                double alpha = (double) getAnimElapsedTime()
                        / (double) getAnimDuration();
                if (isAnimStarting()) {
                } else if (isAnimStopping()) {
                } else if (!isAnimStopped()) {
                    openFrac = alpha < 0.2 ? alpha / 0.2
                            : (alpha < 0.8 ? 1.0 : (1.0 - alpha) / 0.2);
                }
                getChild(0).setRotation(85.0 * openFrac, 0.0, 0.0, 1.0);
            }
        }
In the parameter declaration zone near the top of the file, add the following line:
private int animStep = -1;
In the user interaction zone, add the following lines:
        animStep = (animStep + 1) % 3;
        doors[animStep].startAnimation("", 1000);
In the drawing cycle pre-updating zone, add the following lines:
        doors[0].preUpdate();
        doors[1].preUpdate();
        doors[2].preUpdate();
Make sure that the Case title is RoomWithThreeDoors7. Click on ‘Build C3dapp for the case‘ to build and run the case.
When case building is successful, a new case with title ‘RoomWithThreeDoors7‘ is added in Built Cases. Click or tap on the display to check the opening and closing of each door.
Click on ‘Open case‘ under the title ‘RoomWithThreeDoors7‘ to get back to Case Editor.
Note that the Case title is now RoomWithThreeDoors7_1. Change it to RoomWithThreeDoors.
5.8) People entering and exiting the room
Inside the internal class Person, add the following lines under the line //Set animated position:
                double px;
                double py;
                if (alpha1 < 0.0) {
                    px = -7.0;
                    py = -4.0;
                } else if (alpha1 < 0.3) {
                    px = -7.0 + 2.0 * alpha1 / 0.3;
                    py = -4.0;
                } else if (alpha1 < 0.8) {
                    px = -5.0 + (rpx + 5.0) * (alpha1 - 0.3) / 0.5;
                    py = -4.0 + (rpy + 4.0) * (alpha1 - 0.3) / 0.5;
                } else if (alpha1 < 1.0) {
                    px = rpx;
                    py = rpy;
                } else if (alpha1 < 1.6) {
                    px = rpx + (5.0 - rpx) * (alpha1 - 1.0) / 0.6;
                    py = rpy + (-4.0 + 8.0 * pId - rpy) * (alpha1 - 1.0) / 0.6;
                } else {
                    px = 5.0 + pId * 2.5 * (alpha1 - 1.6) / 0.4;
                    py = 4.0 + (1 - pId) * (-8.0 - 2.5 * (alpha1 - 1.6) / 0.4);
                }
                setTranslation(px, py, 0.0);
Inside the internal class Person, add the following lines under the line //Set person animation:
        private void preUpdate() {
            if (isAnimationOn()) {
                if (animStep == 0 || animStep == pId + 1) {
                    double alpha = (double) getAnimElapsedTime()
                            / (double) getAnimDuration();
                    if (isAnimStarting()) {
                        if (animStep == 0) {
                            alpha = 0.0;
                            setActive(true);
                            setPosition(-1.0);
                        }
                    } else if (isAnimStopping()) {
                        alpha = 1.0;
                        setActive(animStep == 0);
                    } else if (!isAnimStopped()) {
                    }
                    setPosition(alpha + (animStep == 0 ? -0.2 * pId : 1.0));
                }
            }
        }
In the scene initialization zone, add the following lines after existing lines:
        person0.setActive(false);
        person1.setActive(false);
In the user interaction zone, add the following lines after existing lines:
        person0.startAnimation("", 1000);
        person1.startAnimation("", 1000);
In the drawing cycle pre-updating zone, add the following lines after existing lines:
        person0.preUpdate();
        person1.preUpdate();
Make sure that the Case title is RoomWithThreeDoors. Click on ‘Build C3dapp for the case‘ to build and run the case.
When case building is successful, a new case with title ‘RoomWithThreeDoors‘ is added in Built Cases. Click with mouse or tap on the display to check the animation effect of the two people entering and exiting the room.
The coding for the C3dapp case of ‘RoomWithThreeDoors‘ is now complete.
6. Download and save the case on your computer
Continue to work in C3dapp Studio. In the ‘Built Cases’ panel, Click on ‘Save and download case‘ under case title ‘RoomWithThreeDoors‘ to save the case on your local computer. The case file with name ‘RoomWithThreeDoors.zip‘ that has been downloaded can be saved in your chosen folder for later use.
7. Next steps
To find out the ways to use the C3dapps on your website, you may visit C3dapp Studio and click on the ‘Next Steps’ tab.
To learn more about writing C3dapps, you may visit the Tutorials section of C3dapp Studio.
If you’d like to take the alternative approach of working in Desktop Java IDE before moving to C3dapp Studio, you may take a look at the following article:
Write and test 3D apps in Desktop Java IDE before building them in C3dapp Studio for Website use
which is available from the download page.
A pre-prepared C3dapp case zip file RoomWithThreeDoors.zip containing the completed Java source code and the image resources for this tutorial is also available from the download page.